
Hello, attached is a pic of a print i was trying. You can see where the orint didnt fill in near the edges of the circle and ears. What is this called? Im trying to figure out how i can fix it. I had an infil of 40 but it still didnt fill in that gap. Am i missing something? I even told it top layers at 1.5mm. This is uploaded stl sliced on the astrocloud service via web interface. Thanks in advance for any hints to fix this frustrating artifact!

Looks like under extrusion. Possibly a partially clogged extruder, a worn filament driver. It could also be caused by setting the speed too high. This can cause the filament to jam and skip.
Id almost buy the underextrusion but… It doesnt do it anywhere else and it goes clean thru. Id think if it was bad nozzel or skipping it would show else where also. It almost looks like the stops short of filling it in. I think you get a better idea with the picture of the back attached below. But, I will try again with increased extrusion values just to be sure.

This is it still printing… Extrution rate (filament flow %) increased to 110% still seems to show it. And again it is like the gcode is leaving the gap and not printing it right… When i get time ill try and pull the gcode down and run it thru a simulator…

It could be. What does the STL look like in that area? Also is your print bed level and calibrated? The prime lines seem a bit thin
Thanks Daniel for the reply… Lets see, I spent some time playing tonight and this is what I have to show:
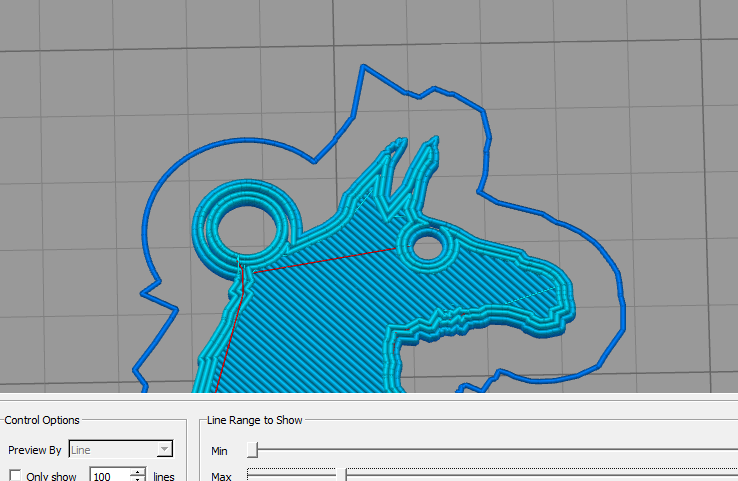
This Picture is the Gcode downloaded from the Astroprint Cloud (Cura Slicer) and I opened it in the Gcode Preview on my Simplify3d Software (I really wish they’d just support direct to astrobox but that is another issue…) In this snap you can see the gcode leaves the gap with the standard settings under Astroprint Cura.
To give us an idea of what we started with, this is the screenshot of Tinkercad of the STL file:

And this is what it looks like when I use the raw STL file and import it into Simplify3d:

And then Sliced in Simplify3d:

Ahaha! so the gap in the circle still exists, so that is how the STL comes across… Even though in Tinkecad it is grouped together and looks solid when viewed in Simplify3d. Hmmm. How can I get the gap filled in that circle. Well, I started thinking about it and changed one thing at the time in S3d. Here is the first change I tried, Increasing the Perimeter shells. That didn’t work, but looked silly:

So the number of outlines/walls increased, but the circle still has that huge gap between the shells. So then I was thinking what else would effect this and I found this Outline Overlap % setting in S3d:

well, 15% looked too low so I changed it to 50% and shazam! It is filling in the gap according to the Gcode preview:

THAT is what I’m trying to do, get that gap filled. So is there a matching setting in the CURA settings of the Astroprint cloud so I don’t have to add extra work to get the S3D to export the Gcode all the time when I want little gaps like that filled?
I’ll run a print of that tonight and see if the Gcode from S3D prints like it shows. I personally like the Cura slicer with my Tevo LM that I’m using and the S3D was usually only used for my Duplicator4s and the Dual nozzles. I’d prefer to find that setting under ASTROPRINT Cura but understand if it doesn’t exist yet in the 15.xxxxx version you use for the engine. (but would kindly request it… lol)
-Steve
Shell Thickness is the only one that I can think of with the current version of Cura. We do have plans to integrate Cura 3 Engine early next year when we’re done with the AstroBox Touch.
Yes, btw I Appriciate the work on the ABtouch and looking forward to future cura upgrade!
I did try increase of shell thickness of 2mm and it just added more lines but didnt fill in the problem circle.

Hopefully ill get S3d to play nice and run my print today and see how that does. Thanks for following along!